 Sometimes you need a little extra storage in a room. Going vertical can help maximize space but it can be hard to find a bookshelf or cart in the specific dimensions your space requires. My favorite solution is to build something myself! You can use the steps in this tutorial to create a short end table, a medium cart, or a tall bookshelf in a variety of widths and depths. Your only limitations are the pre-cut wood (if you don’t own your own tools) and plated slotted angle sizes available to you.
  I built my cart knowing I’d probably use it in a few different rooms in the future, because we tend to move a lot. I used 3 ft. plated slotted angles and cut a 6′ board into three equal pieces. There’s plenty of space between the shelves, so in the future, if I want to add another shelf, I can just get another piece cut and evenly space the two in the middle.

 1. Supplies: 4 – plated slotted angles measuring 1-1/2″ – 1/2×3′, 1 – 1″x12″x6′ piece of pine, 1 – 1″x3″x36″ piece of wood (or scrap wood), 4 – 3″ casters (2 of them should lock), 24 flat phillips screws 14×1-1/4, drill and 1/8 drill bit, handsaw, wood glue, clamps (not necessary), medium and light grade sandpaper, yardstick, pencil, cardboard, spray paint and primer if applicable. Note: You want screws that are short and have big heads. If you have a hard time finding them use washers in between the screw and the hole in the metal. 2. Ask to have your 1″x12″x6′ board pre-cut into three equal pieces in the store if it’s available. This will ensure even cuts. Then use your handsaw to cut four rectangles measuring 1″x3″x4″. Sand each piece with your medium sand paper and then smooth grades to ensure you won’t get splinters. 3. Glue each small piece of wood to the corners of one of your shelves. Make sure the edges are flush. Clamp in place or place a heavy book on top of them as they dry. 4. Leave it for about 10 minutes and then screw your casters in place—one on each small piece of wood as shown. Make sure they’re consistently placed on all four. 5. If you’re going to paint your wooden pieces but not your slotted angles, tape off your casters and then spray paint all of your wood according to manufacturer’s directions. Let them dry before your proceed. If you plan on spray painting it all the same color, do so once it’s completely assembled. 6. Lay your base on it’s edge and place a slotted angle as shown on the bottom corner. Mark and drill. Repeat for each corner of each piece of wood. 7. Carefully screw each slotted angle on starting with the back two sides and working your way around. Note: Your screws may run into each other if they are too long so be sure to get get short screws with wide heads. I used the screws shown above and only had a little bit of a run in between them in each corner.
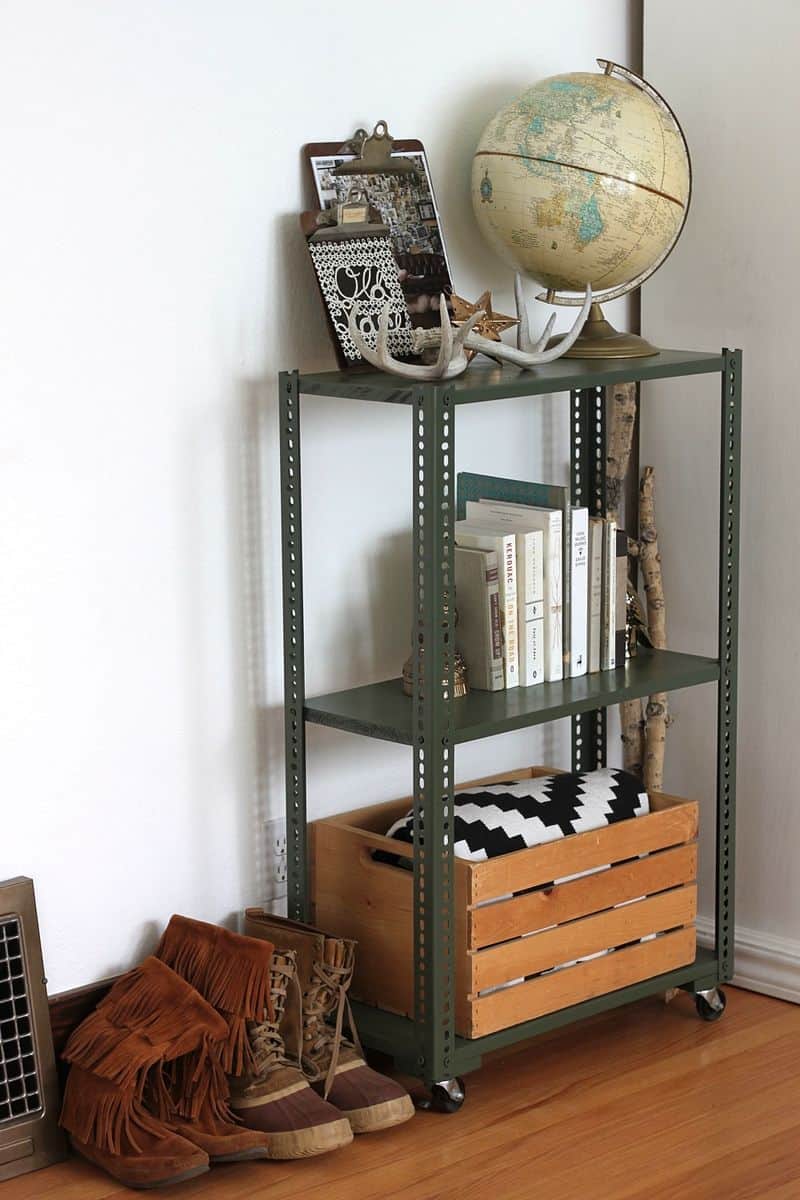
I love a touch of industrial in every space to toughen up the girly vibe that I lean towards. In an all white kitchen, I think bare wood and silver would look great. It’s minimalistic and fresh but can be a bit unfinished looking to some. Here’s an example of how your shelving unit could look painted all one color.  I chose Krylon Italian Olive for my shelf, because I love the industrial look paired with an industrial color. It reminds me of Army green. I then used it to display some of my favorite things in a spot in our dining room. I styled it with bronze, black, white, and wood accents for fall but could easily incorporate a vintage fan, some cameras, a few plants, or layered prints for other seasons.

 My favorite kind of furniture is versatile, so I’m really happy with how this turned out. I can see it being put to work in Sebastian’s room someday or repainted white or gold to fit changing tastes down the road. The best part is that it was still more affordable than buying a pre-made steel shelving unit. I love when projects save me money! –Rachel
The only thing that I didn’t care for is the fact that the angle extends beyond the top shelf on the corners. That would make me crazy and I probably slice my wrist more than once trying to do stuff, because I’m just soooooo talented, lol.
Everything in your house is gorgeous!!
I love the olive green one and the fringed boots 😉
You are amazingly resourceful. I don’t know where you find all the time for these never ending projects!
I love this idea. You can move it from one room to the next without a big to-do. Brilliant.
http://turquoisewildflower.blogspot.com
Love it!
& side note: i love your globe, i want one just like it!
X
http://kendra-genevieve-rose.blogspot.com
I absolutely love the second set up! So cute!!
xo Heather
http://ahopelessnotebook.blogspot.com/
My God ! This is absolutely what I need ! Thank you so much girls 😀
Love them both.
www.leslimarie.com
This is brilliant! A love a combination of rustic and industrial elements, so the first shelf is spot on for me. Thanks for the easy instructions. I feel like I could actually do this project by myself!
Hiyah! This is a really good idea! You are really samrt and productive 🙂
I really like this post, those pictures and tips are pretty helpful and inspiring. In fact, maybe it is because I study in literature, but I am quite curious about what are those books in your bookshelf, or what books would you prefer to put on your bookshelf! Thanks
Olive xox
This is AMAZING!
xx
Kelly
Sparkles and Shoes
This is perfect for small apartments like mine. Cool concept! I’m always changing things up when I get bored with my current look so this is a great way to give the house a facelift. Thanks!
http://www.lauralistardiaries.com
Ha! This is exactly what I was looking for! I’ve been desperately searching for a shelf for a crazy nook in our bathroom and this is it! 🙂 Thanks!!!!
Very useful! I shall use this in decorating my dorm room!
http://collegiatelifestyle.wordpress.com/
as soon as i saw the first picture i knew this was rachel’s!!!! lol that’s scary! haha i love this little shelf to display her pyrex collection.
is that old lace clipboard with the tatting for me for Christmas, sweet Rach?
This is a great idea. May even try to make one for my dorm! Just one question though — where are those brown lace-up snow boots from? I’ve been looking for some like them for ages!
I soooo going to make one myself! I love the second way 🙂
I love this project, the industrial one is my favourute! Thank you for the tutorial!