We made these super simple tissue flowers for Emma’s bachelorette party and I have received SO many requests to share a DIY post about them. They were really easy to make, which is essential when you are party prepping with a to-do list that’s a mile long! Here’s how we made them…
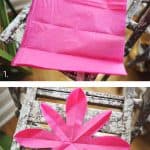
1. Cut a stack of tissue paper (6 pieces is great!) into a 10×10 inch square.
2. Fold them (or just “eyeball it”) and cut your square into a large flower shape. The number of petals isn’t important.
3. Twist and stagger the different layers of paper creating a full looking bloom, similar to a real flower. Stitch the middle of the bloom together with a needle and thread and leave the extra thread hanging of the back of the flower. Use the excess thread to tie each bloom to your string or lights cord. If you hang them on a lights cord, like we did, make sure that each bloom is not touching a light so that they are not a fire hazard. 🙂
It’s amazing how much color and atmosphere these simple tissue flowers added to our porch! I’m so excited by the possibilities of adding different tissue elements to our lights strings for parties in the future. So fun!
I wish I had a garden to throw summer parties like this!!
Amling's Flowerland
Posted: 6 years ago
Ah! Love! I’m planning an outdoor engagement party for two of my best friends that are getting married…this will definitely make the party super cute and special. Now, let’s just pray it doesn’t rain!
Jandyn Markham
Posted: 10 years ago
Yours is the tutorial I’ve been waiting for because it’s so simple and yields a great looking product. I’ve been looking up paper flower crafts since I got engaged, and this one is great. Thank you!
Sally
Posted: 10 years ago
So! much! fun!
Dominika
Posted: 10 years ago
great decoration, so simple and so cuteeeeeeeee!
www.psychocandyvintage.com
Kate C
Posted: 10 years ago
Perfect for birthdays, wedding showers, etc.!
www.dashofkate.blogspot.com
Bailey
Posted: 10 years ago
Wow this is actually so much easier than I thought it would be, when I first saw the pics of these flowers/lights hanging up in the party post! Fabulous touch of color!
xox
Bailey
http://akabailey.blogspot.com
Melodie
Posted: 10 years ago
Pretty!! Need to make these for my next brithday party decoration!
xoxo
Melodie
http://sevenlivesandmore.blogspot.fr/
Pagitta
Posted: 10 years ago
Very cute and very simple. Luv it!
-Pagitta-
Cerise
Posted: 10 years ago
Love these so much. Thanks so much for the tutorial.


I wish I had a garden to throw summer parties like this!!
Ah! Love! I’m planning an outdoor engagement party for two of my best friends that are getting married…this will definitely make the party super cute and special. Now, let’s just pray it doesn’t rain!
Yours is the tutorial I’ve been waiting for because it’s so simple and yields a great looking product. I’ve been looking up paper flower crafts since I got engaged, and this one is great. Thank you!
So! much! fun!
great decoration, so simple and so cuteeeeeeeee!
www.psychocandyvintage.com
Perfect for birthdays, wedding showers, etc.!
www.dashofkate.blogspot.com
Wow this is actually so much easier than I thought it would be, when I first saw the pics of these flowers/lights hanging up in the party post! Fabulous touch of color!
xox
Bailey
http://akabailey.blogspot.com
Pretty!! Need to make these for my next brithday party decoration!
xoxo
Melodie
http://sevenlivesandmore.blogspot.fr/
Very cute and very simple. Luv it!
-Pagitta-
Love these so much. Thanks so much for the tutorial.
Such a cute idea !
http://hidinginheaven.blogspot.fr/2013/06/the-one-with-snake-blouse.html
Ahh they are gorgeous!! I love the lights, i love the paper and I love the flowers 🙂 Great crafty idea 🙂
Ila x
http://cleanserblog.blogspot.co.uk/
Awesome idea. I really like the white ones 🙂
This is such a good idea, they look beautiful!
http://laurenslittleblogs.blogspot.co.uk/
xx
Very creative! I love your blog and it never fails me to get inspired 🙂
http://a-hearts.blogspot.com/
♥aley
These flowers are such a great idea.
This is so pretty and easy 🙂 shared it on my FB timeline here: http://www.facebook.com/pages/Glitters-And-More/148684928615536
I’ll definitely do them!
Thanks for sharing!!
Thank you for sharing!! I was hoping you would do a tutorial on them when I read the post about Emma’s bachelorette party and saw that picture!
I’m so using this for my moms wedding! I’ll share pics of that with you guys if you want to see them lol!