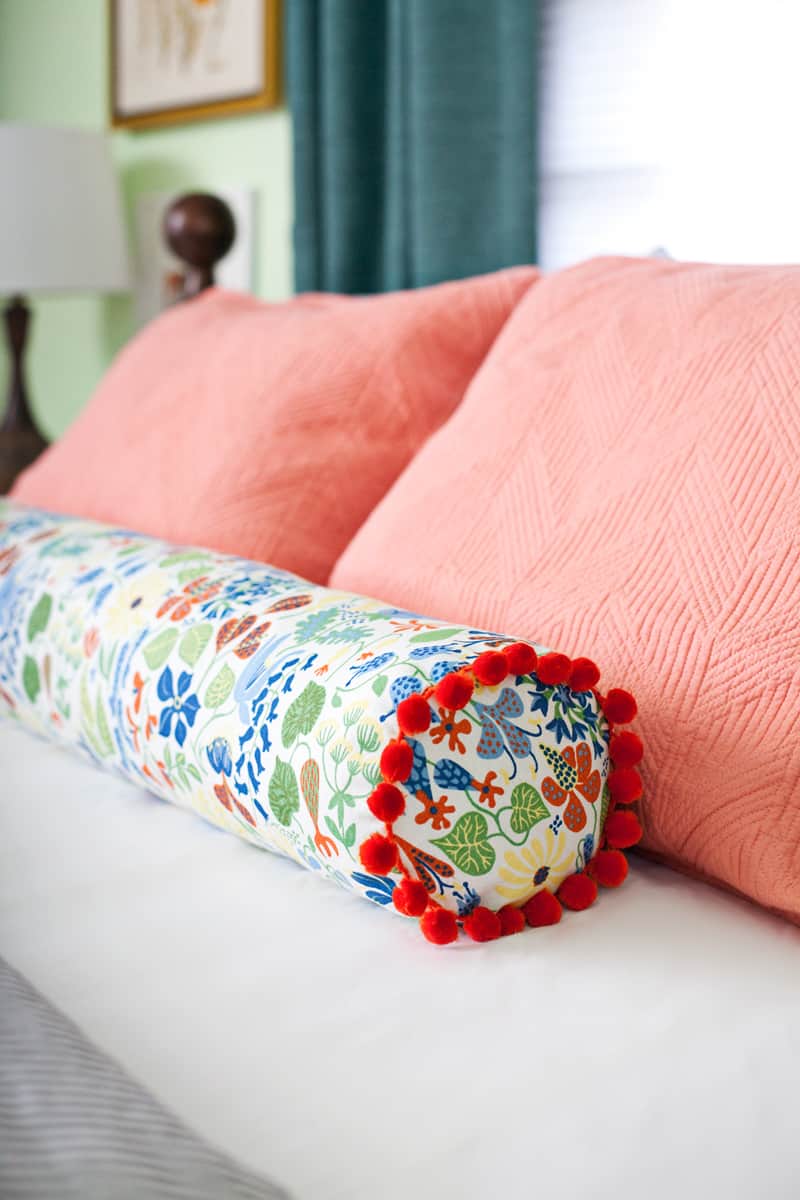
 I’ve always had a bit of a thing for bolster pillows. As a little girl, they’re what I imagined princesses rested their heads on behind the draperies of their canopy beds. But now that I’m an adult, quite beyond my princess phase, bolster pillows can still be a great way to add drama to the bedroom. I know—when you think of mixing things up in the bedroom, the last thing you probably think of is a bolster pillow. But you can use bolster pillows to mix things up on the couch or on a chair too!
If you think your sofa needs a couple of custom bolster pillows alongside the arms, like on Emma’s tailored sofa, or if you’d like to make a long, dramatic pillow for your bedroom like I did, they really are pretty easy to make. Check out how to do it below.
 Supplies:
-fabric (mine is vintage)
-trim (optional)
-loose batting or Poly-fil![]()
-straight pins
-darning needle
-thread to match main color in your fabric
-sewing machine
 Step One: Decide what you want the circumference of your pillow to be and add 1″ to this measurement. Cut your fabric to this measurement. The long side of your bolster pillow should run the width of your fabric. Be sure to add 1″ to this measurement for the hem allowance.
Step Two: Pin the trim (I chose pom poms) to the ends of your fabric as shown above with the finished edge of your trim facing inward. Then stitch it into place, being sure not to get too close to the good edge of your trim or the thread may show on the final pillow.
 Step Three: Fold the fabric in half, as shown above, with the right sides facing inward. Pin the folded fabric into place at the raw edge. Then stitch along the pinned edge, about 1/2″ from the edge.
 Step Four: Flip the sleeve you just stitched right-side-out and get the measurement of its height. Multiply this measurement by two, and that’s the circumference the end caps of your pillow should be. I found a dish just slightly larger than this measurement to use as a template for cutting out the end pieces of fabric.
 Step Five: Use a round object roughly the size of your circumference (make the circle larger or smaller as needed) as a stencil to cut out the end pieces of fabric.
Step Six: Pin the end pieces onto your pillow sleeve with the wrong sides facing out and the right sides facing each other, as shown above. Make sure to follow the shape of the circular pieces of fabric. You may need to remove the pins and adjust them once or twice if your circular fabric isn’t the exact size of your pillow circumference.
 Once you’ve pinned the end caps perfectly, stitch it with the needle shifted close to the edge of your trim, or use a zipper foot to bring the needle close.
Leave one end cap of your pillow only halfway stitched. You will need to reach your hand in there to add the stuffing.
 Step Seven: Flip the pillow right-side-out and fill it with batting. Make sure you are keeping the filling even and condensed. Try to smooth out any lumps from the inside before closing up the pillow.
Step Eight: Use a darning needle and a slip-stitch technique to close up the open end of the pillow. This is a helpful YouTube video if you aren’t sure how to do a slip-stitch.

 I’ve begun thinking about purposefully decorating our bedroom for the first time since moving into our home (we didn’t pick out that green color for the walls), and I think this bolster pillow will be a great jumping off point for me! Maybe something dark and dramatic on the walls will really make it pop, and perhaps I’ll go back to a plain white duvet cover for even more contrast. What do you think? –Mandi
Credits // Author and Photography: Mandi Johnson. Photos edited with Valentine and Stella from the Signature Collection.
Approx. how much stuffing did you end up using for your bolster pillow?
I made this!! I am not a crafty person or much of a seamstress but i do have a sewing machine and I had some old fabric and pillow stuffing that i wanted to squeeze more use out of. this turned out surprisingly well. the instructions were awesome so thank you. the link to the youtube video is obsolete but i found a different instructional video for the slip stitch.
i’m going to make another one that will be even better! the only hiccups were pinning and sewing the end pieces. next time i’m going to cut the circles a little larger than necessary and i think it’ll work out better for me.
Thanks for the awesome instruction. <3
Thanks for the great instructions!!
aww this is so cute! Reminds me of my great granny dorking but in a good young hip kinda way 🙂 http://alessandra48.blogspot.co.uk/
This is very cute!! The pompom trim makes it adorable! Thanks for the great tutorial!
Great tutorial! I love that poppy print by the bed. Where’s it from?
Totally feeling like getting my DIY on now! Great post 🙂
Lorna | www.studsanddreams.com xx
I love the poppy print! Do you remember where it’s from?
haha yes! I was hoping I didn’t go too far with that one. 🙂 -Mandi
So cute! Thanks for the tutorial!
Laura
http://laurahager.blogspot.com
Thank you for sharing this tutorial, I’m definitely going to give it a try, I think my lower back is demanding one ahah.That fabric looks gorgeous too!!
I always wanted pillows like this to be honest, I do really like the shape.
I imagine it would look nice with some lovely pastel colors x
http://inspiremeland.com
Betty
So cute! Love the pom poms especially 🙂 Was the joke about ‘mixing it up in the bedroom’ intentional? Lol, made me laugh anyway!
gorgeous!
xx nikki
www.dream-in-neon.com
Thanks! I had no idea who the designer was. -Mandi
It’s actually a woven blanket that I found at an antique mall several years ago. Sorry! -Mandi
Yes! This exactly has been my savior since I threw out my back last Fall, and especially now that I’m pregnant. -Mandi
Such a beautiful project! I love the look of bolster pillows! Where is your quilt or comforter from? The one with the teal and white triangles? I love it and have been working for something similar!
A bolster is also really useful for relieving low back pain. Put it under your knees to help keep your spine in neutral position while laying in bed.
Very cute and simple! http://www.hannamarielei.com