
")
The upside about ours is that during the warm months, I can use the shade of the carport as a work area for outdoor projects, but the downside is that the carport is located directly next to our backyard patio area.
I have to say that from the start, it was one of my least favorite things about the house. I mean, who wants to be having a beautiful backyard Saturday brunch four feet from their automobiles? Not exactly the backyard ambience I was going for…
I thought about building a wall where the carport and deck meet up, but our house backs up against some woods, and my husband loves the panoramic view of the trees from the porch. So he nixed that idea pretty quickly.
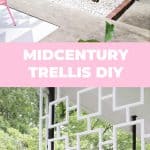
The next best idea was some sort of trellis that would create the feeling of a barrier without blocking the view of the trees on that side of the yard. I actually found a clipping from a mid century magazine that had this pattern for the same type of situation. So I knew it would be perfect for the spot and fit with our mid century theme. HOORAY!
")
")
I used Photoshop to make a mockup of the pattern I wanted to make sure the dimensions were right, and once I had my pattern, I was ready to start building!
")
When cutting a lot of the same length board, it’s helpful to use the same original piece over and over again to measure each cut so that the boards don’t get slightly bigger and bigger or smaller and smaller each time.
")
")
")
I ended up also putting in a long wood screw in almost every place I put a nail as well, so if you don’t have a nail gun, I actually think a drill and wood screws will work fine (although nailing them first is helpful to keep the whole thing together while you put the screws in).
Once the trellis was assembled, I put heavy-duty screw eye hooks on the top bar of the trellis (in the same location of the hooks that were already installed in the roofline) and dug down into the planter directly under the roofline so that we could bury the bottom of the trellis into the ground when we installed it. Now it was time to put it up!
While the trellis wasn’t necessarily that heavy for something so large, it was very delicate. So trying to just pick it up seemed impossible without harming it. I decided that the best way to go would be to clamp five long boards across the trellis so that it would have some support when lifted from the sides.
Once we could lift it up vertically, we carefully walked it over to the porch, set it down into the trench we had dug out, and hung it onto the hooks that hung from above. You can bet we did a major happy dance that it didn’t break in the process!
We probably should have had more people helping us to make sure it was adequately supported, but we were so excited we couldn’t wait! Patience is not my strong suit…
")
Filling all the joints is a bit of a pain, but it really made a big difference in having the trellis look like one unit rather than a ton of small pieces, and it will help weatherize the trellis so it will last longer.
")
")
")
So glad this project turned out so well! On to the next one! xo. Laura.
This article offers a creative DIY project for building a mid-century trellis, adding a stylish and functional element to your outdoor space. If you’re looking to enhance your garden or patio, consider using our concrete services to create sturdy supports for your trellis, ensuring long-lasting durability and stability.
I am late to this post, but saw it on a Pinterest pin and had to comment how much I love it! I am considering doing something similar for a side entrance we have on our mid-century home (which doesn’t have all that much mid-century flair!) thanks for the instructions!
Love this!! Would you be interested in making one to order for us? We’d love to add it to our back patio to hold up a beautiful flower tree, next to the pergola
I don’t really do custom orders but glad you like it!
someone should package this as a DIY kit! I would buy it.
How did you do your math?
this is very interesting to try, the screen is simple but extraordinary result.
This is great! It would make a wonderful room divider too. I have an open floor plan that runs the living room, dining area, and kitchen all together. There is a step down into the living room from the dining area and I’d like to have something to differentiate the two rooms without blocking light. This is would be genius for that. Thanks so much for this post and the effort to go into enough detail so it’s easy to duplicate.
Hello..
Great idea for utilization of outdoor spaces.
Wow fab trellis. Hey are your concrete blocks painted white, or is that the colour of the concrete? I have concrete blocks in their natural aged look and am tossing up whether to paint them white……
Looks great. I bookmarked this post for future reference.
Thank you for the tutorial.
Agnes
findinglifebalancewithagnes.blogspot.com
So true! I should have done that!
Laura 🙂
Good to know! I have seen these around Nashville in the winter though so we’ll see!
Laura 🙂
Merci beaucoup Alexandra! So kind of you!
Laura 🙂
That was josh, it was amazing!
Laura 🙂
From CB2 a few years ago 🙂
Laura
Yep! I just left it in the pot in came in and buried it in the rocks 🙂
Laura
It is our Vette! It’s a ’74!
Laura 🙂
Totally!!
🙂 Laura
It’s a ’74!!
😉
What a great idea! And I LOVE how it turned out!
A brilliant DIY; it’s made such a difference! We have a car port to the front of our home. It doesn’t impact the garden, but it IS ugly. You’ve given me food for thought for sprucing up the space. Thank you! Sue – The World of Suzy Homemaker